Friday 5 April 2019

HOMEMADE CHICKEN NUGGETS WITH SICHUAN SPICES

HOMEMADE CHICKEN NUGGETS WITH SICHUAN SPICES


 Homemade Chicken Nuggets with Sichuan Spices are your kid favorite all grown up. Spicy, flavorful, and juicy, you're gonna want to make these nuggets ASAP.

Ingredients


  • 1 ½ pounds boneless skinless chicken breast
  • Salt, to taste
  • Freshly ground black pepper
  • 2 tablespoons Sichuan peppercorns
  • 1 tablespoon Sichuan chili flakes
  • ⅔ cup all-purpose flour
  • 2 eggs
  • 2 tablespoons water
  • 1½ cups plain dried breadcrumbs
  • 2 teaspoons garlic powder
  • 1 teaspoon onion powder
  • Vegetable oil, for frying


Instructions

  1. Cut the chicken into bite-sized pieces. Season with salt and fresh black pepper. Set aside.
  2. In a dry pan, toast the Sichuan peppercorns and chili flakes until fragrant. Grind the spice mixture with a spice grinder or mortar and pestle. Stir in a teaspoon of salt, and set aside.
  3. Prepare your breading assembly line by getting 3 shallow dishes. In the first dish, add ⅔ cup all purpose flour. In the second dish, beat 2 eggs together with 2 tablespoons water. In the third and final dish, mix together 1½ cups plain dried breadcrumbs, garlic powder, onion powder, and more salt and pepper to taste.
  4. Bread the chicken a few pieces at a time by first dredging them in flour, then coating them in egg, and finally coating them in the seasoned breadcrumbs. Shake off any excess breadcrumb and set aside on a plate.
  5. Meanwhile, heat a ½ inch of vegetable oil in a cast iron skillet over medium heat. When the oil reaches 375 degrees F, and all your chicken has been breaded, fry them in batches until golden on all sides. This will take about 3 minutes per batch, flipping the nuggets as needed. Ensure the oil temperature comes back up to 375 degrees before frying each batch. After they’re fried, immediately sprinkle with your ground spice and salt mixture.

  6. Repeat until all the chicken nuggets have been fried. Serve!
HOMEMADE CHICKEN NUGGETS WITH SICHUAN SPICES

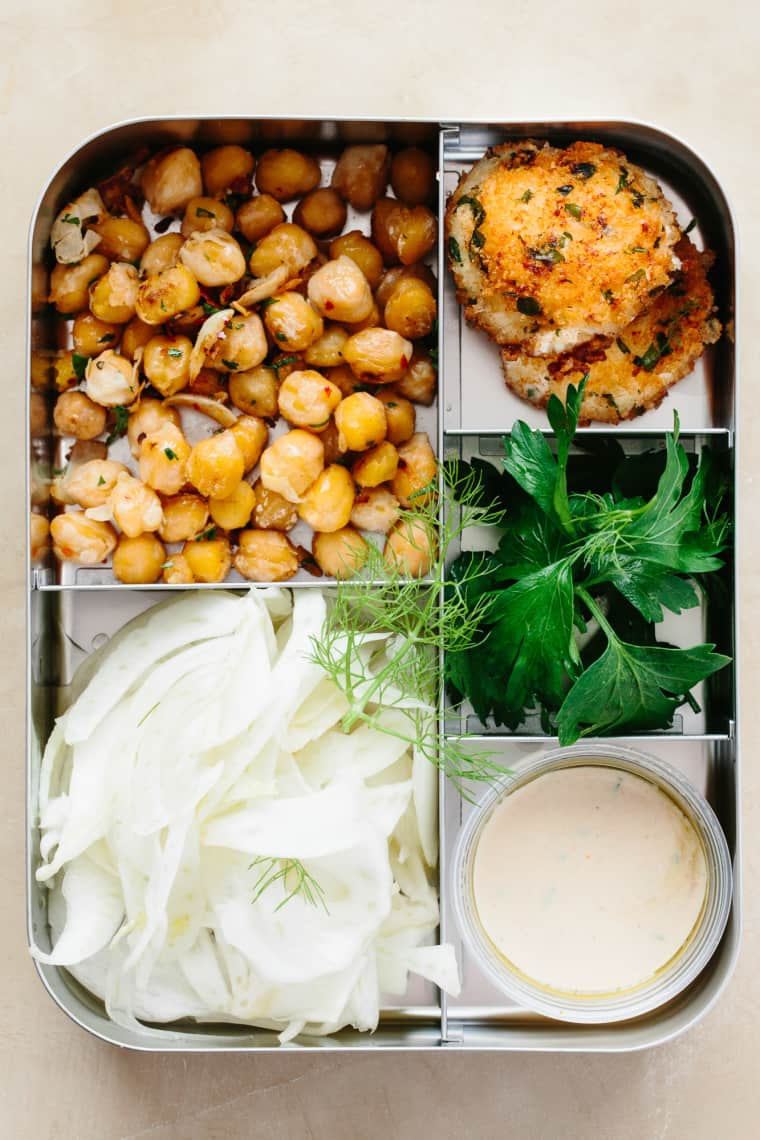
Garlicky Chickpea and Fennel Salad with Baked Goat Cheese

Garlicky Chickpea and Fennel Salad with Baked Goat Cheese


INGREDIENTS

  • 12 ounces fresh goat cheese
  • 2 tablespoons olive oil
  • 1 (15-ounce) can garbanzo beans, drained, rinsed, and patted dry with a paper towel
  • 1 1/2 teaspoons kosher salt, divided
  • 1/2 teaspoon red pepper flakes
  • 4 large egg whites
  • 1 cup breadcrumbs
  • Freshly ground black pepper
  • 4 medium fennel bulbs, thinly sliced
  • Juice of 1 medium lemon
  • 1/4 cup fennel fronds, coarsely chopped
  • 1/4 cup fresh parsley leaves, coarsely chopped
  • 1/2 cup tahini roasted garlic dressing


INSTRUCTIONS


  1. Use your hands to shape the goat cheese into 20 (1-inch) balls and place on a plate. Refrigerate for 15 to 20 minutes to firm up. Meanwhile, heat the oven and cook the chickpeas.
  2. Arrange a rack in the middle of the oven and heat to 375°F. Line a baking sheet with parchment paper.
  3. Heat the oil in a large frying pan over medium-high heat until shimmering. Add the beans to the pan in a single layer. Cook undisturbed until the beans are lightly browned on the bottom, 2 to 4 minutes. Add 1/2 teaspoon of the salt and red pepper flakes and stir to combine. Spread out again and cook, stirring as needed, until golden-brown and blistered on all sides, 3 to 5 minutes more. Remove the chickpeas from the heat and cool slightly before serving or store in the refrigerator in an airtight container.
  4. Whisk the egg whites in a small bowl. Combine the breadcrumbs, remaining 1 teaspoon salt, and black pepper in another small bowl.
  5. Remove the cheese balls from the refrigerator. Gently but firmly press each ball into a thick disk, smoothing the sides with your finger. Dip a disk into the egg whites, turning it to coat and then allowing any excess to drip off, and then completely coat in the breadcrumb mixture. Place on the prepared baking sheet and repeat with the remaining discs.
  6. Bake until golden-brown and the cheese is warmed through, 13 to 15 minutes. (A minute or two under the broiler will brown them more if needed.) Cool for at least 5 minutes before serving. Use a small spatula to gently reshape the disks if needed.
  7. Toss the fennel with the lemon juice in a large bowl. Use immediately or cover and store in the refrigerator (for up to 5 days) until ready to serve.
  8. When ready to serve, stir the chickpeas, fennel fronds, and parsley into the fennel, then divide the mixture between 4 plates. Top with the baked goat cheese rounds and drizzle with the dressing.


RECIPE NOTES
Accompanying recipe: We used tahini roasted garlic dressing.

Make ahead: The cheese balls can be formed and stored in the refrigerator up to 3 days ahead.


Garlicky Chickpea and Fennel Salad with Baked Goat Cheese

VEGAN BAO BUNS WITH PULLED JACKFRUIT

VEGAN BAO BUNS WITH PULLED JACKFRUIT

INGREDIENTS


  • BUNS (can be made 1 day ahead)
  • 300 g / 2½ cups bao flour OR all purpose flour
  • 2 tsp instant active yeast
  • 1½ tbsp / 20 ml vegetable oil
  • 1 tsp fine sea salt
  • 2 tsp sugar (optional)


FILLING


  • 560 g / 20 oz tin of green / young jackfruit (this is the brand I used)
  • 2 small spring onions, sliced
  • 4 tsp grated ginger
  • 3 garlic cloves, finely chopped
  • 3-4 tsp tamari / soy sauce, adjust to taste
  • 1 tbsp rice vinegar
  • 2 tbsp hoisin sauce (plus extra to serve)
  • 2 tsp brown sugar or maple syrup
  • 2 tbsp vegetable oil, for frying (I used peanut oil)
  • 1 heaped tsp Chinese five spice


OTHER CONDIMENTS


  • sliced fresh chilli or chilli sauce
  • ½ English cucumber, cut into matchsticks
  • ½ daikon or 1 turnip, cut into matchsticks
  • red cabbage, shredded finely
  • roasted (unsalted) peanuts, crushed or chopped
  • spring onion, sliced finely
  • fresh coriander


METHOD

  1. In a mixing bowl, combine flour, instant yeast, sugar and salt. Add about 120 ml / ½ cup of warm (that’s important) water and 1½ tbsp of oil. Once combined roughly with a wooden spoon, start combining the dough with your hands. It will need a bit more water but it is very important to add the water in gradually, tablespoon by tablespoon. In my experience it takes another 2-3 tablespoons of water to achieve a dough that is not too dry or not too sticky. Knead it for 10 minutes with your hands until elastic and smooth. Form the dough into a ball and rub a small amount of oil on the dough’s surface to prevent drying. Place in a clean bowl covered with a kitchen towel and place it somewhere warm (but not too warm, sticking it too close to a fireplace is a bad idea, for example) for 1-2 hrs or until it doubles in size.
  2. Cut two circles (if you have a two tier bamboo steamer) of baking paper to line the steamer with. Make a lot of small holes in the circles so that the steam can get through. You can use a paper puncher for this or fold each circle in half 3 times and cut small circles out along the folded edges with a pair of scissors. Prepare also eight 5 cm / 2″ squares of baking paper and insert into the buns to prevent the two halves from sticking to each other (you could also use oil instead).
  3. After the dough has doubled in size, tip it out onto a lightly floured surface and press the air our with your fingertips. Divide the dough into 8 equal pieces and form small balls. Place the balls on a lightly floured surface, cover with a kitchen towel and leave for another 30 min.
  4. Using a rolling pin, roll the balls out into ½ cm / ¼” thick oval shapes. Fold each shape in half and insert a square of baking paper between the two halves. Alternatively you could also oil the buns before folding in half.
  5. Line your bamboo steamer with paper circles you’ve made earlier and place folded up buns inside for another 30 min of proving. If your steamer is too small (like mine), place four buns inside (two on each tier) and rest the remaining four on a baking paper lined and lightly dusted tray until you are ready to steam.
  6. Half fill a pot (which the steamer can comfortably sit on, of course) with water and place the steamer with the buns on top. Whack the heat to medium-high (I used setting 4 out of 6) and let the water come to a simmer – don’t be tempted to peak inside or you will ruin the buns. Once you can hear the water simmering vigorously, put the timer on to 10 mins. After the time is up, take the pot and steamer off the heat and rest the buns for another 5 minutes. This will spare the buns temperature shock  and will prevent them from shrinking. After 5 minutes, lift the lid off and remove the buns gently. Cook the remaining four like you did the first four.

FILLING

  1. Open the can of jackfruit and drain it. Cut the firm, pointy ends off each triangular piece of jackfruit (you can still use them if you wish) and squash each piece of jackfruit gently so that it separates into individual strands and soaks up more of the cooking sauce. Set aside.
  2. Heat up 2 tbsp of oil in a medium size pan. Fry spring onions until softened. Add chopped garlic and ginger and fry gently until soft and fragrant.
  3. Mix in Chinese five spice and fry gently for one minute.
  4. Now add the remaining sauce ingredients: tamari / soy sauce, hoisin sauce, rice vinegar and sugar. Mix them around well, allow sugar to melt. Finally add in jackfruit and mix well to allow it to warm up and soak up the maximum amount of sauce.
  5. Fill each bun with pulled jackfruit, fresh veggies, herbs, chilli, crushed peanuts and some extra hoisin sauce.
VEGAN BAO BUNS WITH PULLED JACKFRUIT

Crispy Honey Chilli Potatoes So Easy To Make at Home!

Crispy Honey Chilli Potatoes are a super addictive snack – fried potato fingers are tossed in a sesame honey chilli sauce that’s sweet and spicy and will give you sticky fingers that you’ll be licking. You can use the same recipe to make honey chilli cauliflower, honey chilli mushrooms, honey chilli lotus stem etc – the possibilities are really endless!

Crispy Honey Chilli Potatoes  So Easy To Make at Home!


  • Prep Time: 10 minutes
  •  
  • Cook Time: 30 minutes
  •  
  • Yield: 4 Servings
  •  
  • Category: Appetiser
  •  
  • Method: Deep Frying
  •  
  • Cuisine: Chinese

  • DESCRIPTION

    Crispy Honey Chilli Potatoes are a super addictive snack – fried potato fingers are tossed in a sesame honey chilli sauce that’s sweet and spicy and will give you sticky fingers that you’ll be licking to get every last bit of sauce!

    INGREDIENTS

    • 4-5 medium Potatoes, peeled and cut into fingers
    • Oil for deep frying
    First Coating:
    • 2 teaspoon Chilli powder
    • 1 teaspoon Garlic Paste
    • 1 teaspoon Red Chilli Paste
    • 3 tablespoon Corn Flour
    • 3 tablespoon All Purpose Flour
    • 2 teaspoon Salt
    Second Coating:
    • 3 tablespoon All Purpose Flour
    • 3 tablespoon Corn Flour
    • 1/4 teaspoon Black Pepper
    • 2-3 tablespoon Water
    For the Sauce:
    • 2 tablespoon Oil
    • 1 tablespoon finely chopped Garlic
    • 1 teaspoon Red Chilli Flakes
    • 3 tablespoon White Sesame Seeds
    • 1 teaspoon Vinegar
    • 1 teaspoon Soy Sauce
    • 2 tablespoon Tomato Ketchup
    • 1 1/2 tablespoon Honey
    • 1 teaspoon Red Chilli Paste
    • 1/4 cup Water + 1 teaspoon Corn Flour mixed to make a slurry
    • 2 tablespoon chopped Spring Onion (green part only)

    INSTRUCTIONS

    1. Wash potato fingers well in running water and set aside. This removes any extra starch in the potatoes.
    2. Mix together corn flour, all purpose flour, chilli powder, chilli paste and salt. Coat the potato fingers evenly with this flour mix. Heat oil in a wok or karahi and deep fry the potato fingers in batches till the potato is half cooked. It’s important that you drop one potato finger at a time in to the oil so that they don’t stick together (watch video above to see how to do this). Remove the potato fingers on a tissue lined plate and let them cool.
    3. For the second coating, make a medium thick batter with all purpose flour, corn flour and pepper powder by adding just a few tablespoons of water. Dip the half done fries in this batter and fry again in hot oil till crisp and golden. Drain on a kitchen paper and keep aside.
    4. Heat 2 tablespoons oil in another wok, add chopped garlic and stir fry for a few seconds. Add chili flakes and sesame seeds and saute for another minute to toast them. Now add vinegar, soy sauce, ketchup, honey and the red chili paste and stir together. Mix corn flour with 1/4 cup water to make a slurry and add this to the honey- vinegar mixture in the wok and stir for a few seconds till it thickens.
    5. Add the fried potato fingers and spring onion greens and toss together so that they are coated evenly in sauce. Switch off the flame and serve immediately garnished with some more sesame seeds and spring onion greens.

    NOTES

    • You may adjust the quantity of honey as per your taste
    • Its important to cut the potato fingers evenly so that they cook evenly
    • You will need approximately two cups oil for deep frying, and you can use the same oil for the second frying
    • A wok is the best way to coat the potatoes in sauce, because it provides enough space to toss them around, but if you don’t have one, feel free to use a frying pan
    Crispy Honey Chilli Potatoes  So Easy To Make at Home!