Showing posts with label Salad. Show all posts

Friday, 14 July 2023

A Flavorful Appetizer for Every Occasion

Caprese skewers are a delicious and refreshing appetizer that combines the flavors of ripe tomatoes, fresh mozzarella cheese, and fragrant basil. Here's a simple recipe to make Caprese skewers: 

A Flavorful Appetizer for Every Occasion


Ingredients:
  • Cherry or grape tomatoes
  • Fresh mozzarella cheese balls (bocconcini)
  • Fresh basil leaves
  • Balsamic glaze (optional)
  • Skewers or toothpicks
Instructions:

  1. Rinse the tomatoes and basil leaves under cold water. Pat them dry with a paper towel.
  2. Drain the mozzarella cheese balls if they come in liquid.
  3. Take a skewer or toothpick and start assembling the skewers. Begin by threading a tomato onto the skewer.
  4. Follow with a basil leaf folded in half or torn into smaller pieces for better presentation.
  5. Next, add a mozzarella ball.
  6. Repeat the tomato, basil, and mozzarella layer until you've reached your desired number of skewers.
  7. Arrange the Caprese skewers on a platter or serving dish.
  8. If desired, drizzle balsamic glaze over the skewers for added flavour and decoration.
  9. Serve the Caprese skewers immediately as an appetizer or finger food.
  10. Note: You can get creative with the presentation by arranging the skewers in a circular pattern or alternating the colors of the tomatoes (using both red and yellow varieties, for example). You can also sprinkle some salt and pepper over the skewers for additional seasoning if desired.
A Flavorful Appetizer for Every Occasion


Enjoy your homemade Caprese skewers!

Saturday, 8 July 2023

Summer's Finest: BBQ Chicken Skewer Salad

Get ready to sink your teeth into a mouthwatering delight inspired by the iconic California Pizza Kitchen (CPK). This at-home rendition of their famous BBQ Chicken Salad is filled with an array of delicious ingredients, tossed in a flavorful herby ranch dressing, and crowned with tender BBQ chicken. 

This fun and refreshing summer salad will satisfy your taste buds and leave you craving for more. Discover the secrets to recreating CPK's beloved flavors in your own kitchen and indulge in this delectable culinary experience. Don't miss out on this irresistible summer delicacy! 

Summer's Finest: BBQ Chicken Skewer Salad

Summer's Finest: BBQ Chicken Skewer Salad

Summer's Finest: BBQ Chicken Skewer Salad

BBQ Chicken Skewer Salad

PREP: 20MINUTES MINSCOOK: 15MINUTES MINS SERVINGS: 4 PEOPLE


Ingredients 

For the Chicken Skewers:

  • 2 pounds boneless skinless chicken breasts
  • 3 tbsp avocado oil
  • 1 tsp kosher salt
  • 2 cups bbq sauce I use Primal Kitchen brand
  • 8 [6-inch] wooden skewers pre-soaked

For the w30 Herby Ranch:
  • 1 cup light tasting oil I use Safflower Seed Oil or Avocado Oil. You can also use "light" olive oil, which is not the same as extra virgin; sub store-bought mayo
  • 1 egg
  • ½ cup unsweetened full fat coconut milk
  • 2 tbsp lemon juice
  • 1 tbsp red wine vinegar
  • 1 tsp kosher salt
  • 1 tsp onion powder
  • 2 cloves minced garlic
  • ¼ cup finely chopped fresh dill fronds
  • ¼ cup finely chopped fresh parsley
  • 1 tsp freshly cracked black pepper.

For the Salad:
  • 4 ears corn omit for Whole30.
  • 2 tbsp avocado oil
  • 8 cups thinly sliced romaine lettuce or 2 small heads
  • 6 green onions thinly sliced (green part only)
  • 2 cups quartered grape tomatoes or 16 ounces
  • 1 [15-ounce] can black beans, drained and rinsed *omit for Whole30
  • ¼ cup loosely packed freshly chopped cilantro leaves
  • 2 tbsp freshly chopped basil leaves
  • 1 avocado peeled and seed removed and diced medium.

Instructions 

Marinate the chicken:
  • Using a meat mallet or the bottom of a heavy skillet, pound the chicken until it is a uniform ½ inch thickness. Cube into 2-inch pieces and place in a large bowl with the oil, salt, and 1 cup of BBQ sauce. Stir until well combined. Set aside to let marinate for at least 20 minutes at room temperature, or cover and refrigerate for 4-8 hours to refrigerate and marinate longer, if desired.

Make the herby ranch:
  • Pour oil into a wide mouth jar (just slightly larger than the mouth of an immersion blender). Crack the egg into the oil and let sink to the bottom of the jar. Insert the immersion blender into the jar and rest the blade on top of the yolk. Do not move the head until a white, creamy, thick mayo forms at the bottom by the head--about 10 seconds at least. Now, slowly raise the immersion blender up and down until the entire jar has emulsified into a mayo. (*alternatively, you can use a cup of store-bought mayo. I just recommend using one that is very light in flavor).
  • Add the coconut milk, lemon, red wine vinegar, salt, onion powder, and garlic and using the immersion blender, blend once more to combine. Stir in the dill, parsley and black pepper. Refrigerate until ready to use. This keeps for up to 1 week in the fridge.

Grill the Chicken and make the Salad:
  • Drizzle the corn with the avocado oil and rub to evenly coat.
  • Heat grill over medium-high heat (350-400 degrees F) and oil the grill grates (to do to this, dip a wadded paper towel in a little oil and, using tongs, wipe the oil evenly over the grate. Be careful not to use too much oil, because that's a sure-fire way to start a good flare-up a little goes a long way here.)
  • When hot, add the corn and cook until tender, about 10-12 minutes total and turning every 2 minutes. Meanwhile, also place the skewers on the grill and cook on the first side for 3 to 4 minutes, or until nice grill marks have formed. Flip the skewers and then baste the grilled side generously with the reserved BBQ sauce, continue to cook until chicken is cooked through, and nice grill marks have formed on both sides, 3-4 more minutes. The grill should be closed as much as possible as you are cooking the chicken. Transfer the corn and the chicken aside and let the corn cool enough to handle.
  • Meanwhile, in a large bowl combine the lettuce, green onions, tomatoes, black beans, cilantro and basil. Add your desired amount of dressing to the salad and toss until the lettuce is well coated.
  • Remove the corn from the cobb and add to the salad along with the diced avocado, gently toss once more to combine.
  • Serve with the grilled chicken and enjoy!

Friday, 5 April 2019

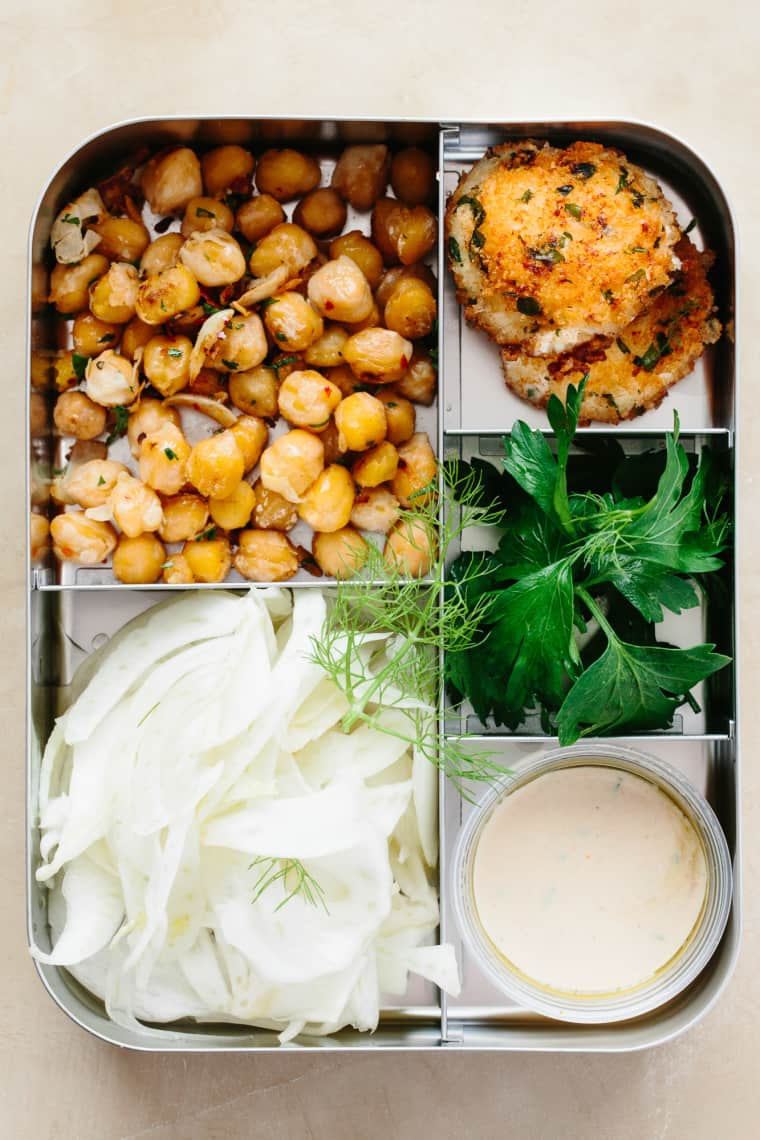
Garlicky Chickpea and Fennel Salad with Baked Goat Cheese

Garlicky Chickpea and Fennel Salad with Baked Goat Cheese


INGREDIENTS

  • 12 ounces fresh goat cheese
  • 2 tablespoons olive oil
  • 1 (15-ounce) can garbanzo beans, drained, rinsed, and patted dry with a paper towel
  • 1 1/2 teaspoons kosher salt, divided
  • 1/2 teaspoon red pepper flakes
  • 4 large egg whites
  • 1 cup breadcrumbs
  • Freshly ground black pepper
  • 4 medium fennel bulbs, thinly sliced
  • Juice of 1 medium lemon
  • 1/4 cup fennel fronds, coarsely chopped
  • 1/4 cup fresh parsley leaves, coarsely chopped
  • 1/2 cup tahini roasted garlic dressing


INSTRUCTIONS


  1. Use your hands to shape the goat cheese into 20 (1-inch) balls and place on a plate. Refrigerate for 15 to 20 minutes to firm up. Meanwhile, heat the oven and cook the chickpeas.
  2. Arrange a rack in the middle of the oven and heat to 375°F. Line a baking sheet with parchment paper.
  3. Heat the oil in a large frying pan over medium-high heat until shimmering. Add the beans to the pan in a single layer. Cook undisturbed until the beans are lightly browned on the bottom, 2 to 4 minutes. Add 1/2 teaspoon of the salt and red pepper flakes and stir to combine. Spread out again and cook, stirring as needed, until golden-brown and blistered on all sides, 3 to 5 minutes more. Remove the chickpeas from the heat and cool slightly before serving or store in the refrigerator in an airtight container.
  4. Whisk the egg whites in a small bowl. Combine the breadcrumbs, remaining 1 teaspoon salt, and black pepper in another small bowl.
  5. Remove the cheese balls from the refrigerator. Gently but firmly press each ball into a thick disk, smoothing the sides with your finger. Dip a disk into the egg whites, turning it to coat and then allowing any excess to drip off, and then completely coat in the breadcrumb mixture. Place on the prepared baking sheet and repeat with the remaining discs.
  6. Bake until golden-brown and the cheese is warmed through, 13 to 15 minutes. (A minute or two under the broiler will brown them more if needed.) Cool for at least 5 minutes before serving. Use a small spatula to gently reshape the disks if needed.
  7. Toss the fennel with the lemon juice in a large bowl. Use immediately or cover and store in the refrigerator (for up to 5 days) until ready to serve.
  8. When ready to serve, stir the chickpeas, fennel fronds, and parsley into the fennel, then divide the mixture between 4 plates. Top with the baked goat cheese rounds and drizzle with the dressing.


RECIPE NOTES
Accompanying recipe: We used tahini roasted garlic dressing.

Make ahead: The cheese balls can be formed and stored in the refrigerator up to 3 days ahead.


Garlicky Chickpea and Fennel Salad with Baked Goat Cheese

VEGAN BAO BUNS WITH PULLED JACKFRUIT

VEGAN BAO BUNS WITH PULLED JACKFRUIT

INGREDIENTS


  • BUNS (can be made 1 day ahead)
  • 300 g / 2½ cups bao flour OR all purpose flour
  • 2 tsp instant active yeast
  • 1½ tbsp / 20 ml vegetable oil
  • 1 tsp fine sea salt
  • 2 tsp sugar (optional)


FILLING


  • 560 g / 20 oz tin of green / young jackfruit (this is the brand I used)
  • 2 small spring onions, sliced
  • 4 tsp grated ginger
  • 3 garlic cloves, finely chopped
  • 3-4 tsp tamari / soy sauce, adjust to taste
  • 1 tbsp rice vinegar
  • 2 tbsp hoisin sauce (plus extra to serve)
  • 2 tsp brown sugar or maple syrup
  • 2 tbsp vegetable oil, for frying (I used peanut oil)
  • 1 heaped tsp Chinese five spice


OTHER CONDIMENTS


  • sliced fresh chilli or chilli sauce
  • ½ English cucumber, cut into matchsticks
  • ½ daikon or 1 turnip, cut into matchsticks
  • red cabbage, shredded finely
  • roasted (unsalted) peanuts, crushed or chopped
  • spring onion, sliced finely
  • fresh coriander


METHOD

  1. In a mixing bowl, combine flour, instant yeast, sugar and salt. Add about 120 ml / ½ cup of warm (that’s important) water and 1½ tbsp of oil. Once combined roughly with a wooden spoon, start combining the dough with your hands. It will need a bit more water but it is very important to add the water in gradually, tablespoon by tablespoon. In my experience it takes another 2-3 tablespoons of water to achieve a dough that is not too dry or not too sticky. Knead it for 10 minutes with your hands until elastic and smooth. Form the dough into a ball and rub a small amount of oil on the dough’s surface to prevent drying. Place in a clean bowl covered with a kitchen towel and place it somewhere warm (but not too warm, sticking it too close to a fireplace is a bad idea, for example) for 1-2 hrs or until it doubles in size.
  2. Cut two circles (if you have a two tier bamboo steamer) of baking paper to line the steamer with. Make a lot of small holes in the circles so that the steam can get through. You can use a paper puncher for this or fold each circle in half 3 times and cut small circles out along the folded edges with a pair of scissors. Prepare also eight 5 cm / 2″ squares of baking paper and insert into the buns to prevent the two halves from sticking to each other (you could also use oil instead).
  3. After the dough has doubled in size, tip it out onto a lightly floured surface and press the air our with your fingertips. Divide the dough into 8 equal pieces and form small balls. Place the balls on a lightly floured surface, cover with a kitchen towel and leave for another 30 min.
  4. Using a rolling pin, roll the balls out into ½ cm / ¼” thick oval shapes. Fold each shape in half and insert a square of baking paper between the two halves. Alternatively you could also oil the buns before folding in half.
  5. Line your bamboo steamer with paper circles you’ve made earlier and place folded up buns inside for another 30 min of proving. If your steamer is too small (like mine), place four buns inside (two on each tier) and rest the remaining four on a baking paper lined and lightly dusted tray until you are ready to steam.
  6. Half fill a pot (which the steamer can comfortably sit on, of course) with water and place the steamer with the buns on top. Whack the heat to medium-high (I used setting 4 out of 6) and let the water come to a simmer – don’t be tempted to peak inside or you will ruin the buns. Once you can hear the water simmering vigorously, put the timer on to 10 mins. After the time is up, take the pot and steamer off the heat and rest the buns for another 5 minutes. This will spare the buns temperature shock  and will prevent them from shrinking. After 5 minutes, lift the lid off and remove the buns gently. Cook the remaining four like you did the first four.

FILLING

  1. Open the can of jackfruit and drain it. Cut the firm, pointy ends off each triangular piece of jackfruit (you can still use them if you wish) and squash each piece of jackfruit gently so that it separates into individual strands and soaks up more of the cooking sauce. Set aside.
  2. Heat up 2 tbsp of oil in a medium size pan. Fry spring onions until softened. Add chopped garlic and ginger and fry gently until soft and fragrant.
  3. Mix in Chinese five spice and fry gently for one minute.
  4. Now add the remaining sauce ingredients: tamari / soy sauce, hoisin sauce, rice vinegar and sugar. Mix them around well, allow sugar to melt. Finally add in jackfruit and mix well to allow it to warm up and soak up the maximum amount of sauce.
  5. Fill each bun with pulled jackfruit, fresh veggies, herbs, chilli, crushed peanuts and some extra hoisin sauce.
VEGAN BAO BUNS WITH PULLED JACKFRUIT

Tuesday, 26 May 2015

Irish Eggs Benedict With Corned Beef And Cabbage Hash

Irish Eggs Benedict With Corned Beef And Cabbage Hash

INGREDIENTS:

For the Corned Beef Brisket
. 1 whole yellow onion, quartered
. 3 pound corned beef brisket
. 8 ounces Guinness
Water

For the Irish Soda Bread
. I used this recipe from Eat Live Run. (The only alteration I made was eliminating the oats.)

For the Hollandaise Sauce
. I used this recipe from Tyler Florence. (I've used this multiple times and it always comes out perfect! Tip: An electric whisk will make this SO easy and fast!)

For the Corned Beef and Cabbage Hash
. 2 Tablespoons Butter
. 1/2 head cabbage
. 1 pound potatoes, boiled until cooked
. salt and pepper

For the Assembly
. 2 Tomatoes, sliced
. 4-6 cups fresh spinach, wilted
. 6 eggs,poached (Here is a great and easy how-to!)

Directions:

1. The night before your breakfast/brunch. In a 5 quart crock pot, throw in the quartered onion.

2. Place in the beef brisket, fatty side up.

3. Pour the beer over the brisket, and pour water over it until it is almost covered.

4. Put the lid on and cook on low overnight for 10 hours.

5. In the morning, pull it out and set it on a cutting board. Allow it to rest for 10-15 minutes before slicing. Reserve the onions and cooking liquid.

6. In the meantime, make your Irish Soda Bread, bake it, and set it aside.

7. Make your hollandaise sauce, and keep warm resting over a double boiler on low until ready to use. (If it thickens up to much by the time you're ready to use it, just add a few drops of water until its back to its correct consistency!)

8. To assemble, toast a slice of the Irish soda bread, and cut it in half.

9. Place a slice of tomato on each half, followed by a spoonful of wilted spinach.

10. Add on a slice or two of the beef brisket. Place a poached egg on top.

11. Spoon on some hollandaise sauce.

To make the Corned Beef and Cabbage Hash

12. Roughly smash up the boiled potatoes.

13. Add in 2 cups of chopped up corned beef, and some salt and pepper

14. Heat a large skillet up to medium-high heat, and ,e,t the 2 Tablespoons of butter.

15. Add the reserved onions from the crock pot and using a spatula push the potato mix down flat.

16. Cook until brown and flip cooking the other side until brown. Roughly toss.

17. In a separate skillet with a fitted lid, toss the cabbage with 1/2 cup of the reserved cooking liquid from the corned beef.

18. Cover and cook until softened.

19. Once done, drain all except 1 tablespoon of the liquid.

20. Add the cabbage and remaining liquid to the corned beef hash. Toss to mix thoroughly.

Friday, 15 May 2015

Cobb salad with buttermilk ranch dressing

Cobb salad with buttermilk ranch dressing


INGREDIENTS:

. 2 Baby Gem lettuces, leaves separated
. 1 avocado, stoned and sliced
. 2 plum tomatoes, chopped
. 3 rashers cooked crispy bacon
. 140g/5oz cooked turkey breast or chicken, cut into bite-sized pieces
. 2 hard-boiled eggs, chopped into chunks
. 75ml buttermilk
. 2 tbsp light mayonnaise
. 1 tbsp white wine vinegar
. 1 tbsp chopped dill

Method:

1. In a small bowl, whisk the dressing ingredients together with some salt. Arrange the salad ingredients separately on 2 plates or a platter, and serve with the dressing on the side.

Saturday, 25 April 2015

Arugula Corn Salad with Bacon Recipe

Arugula Corn Salad with Bacon Recipe

INGREDIENTS:

4 large ears of corn
2 cups of chopped arugula (about one bunch)
4 strips of bacon, cooked, chopped
1/3 cup chopped green onions
1 Tbsp olive oil
1 Tbsp white wine vinegar
1/8 teaspoon ground cumin
Salt and freshly ground black pepper to taste

Method:

1: Cook the corn ears, in their husks, either on the grill for a smokey flavor, or by steaming in a large covered stock pot with an inch of boiling water at the bottom of the pot, for 12-15 minutes. Let the corn cool (can run under cold water to speed up the cooling), remove the husks and silk. I recommend cooking the corn in the husks for the added flavor that the husks impart. If you boil or steam the corn ears after you've already husked them, or if you cook them in the microwave, reduce the cooking time by a few minutes.
cutting-corn-on-cob.jpg

2: To remove the kernels from the cobs, stand a corn cob vertically over a large, shallow bowl. Use a sharp knife to make long, downward strokes, removing the kernels from the cob, as you work your way around the cob. Note: it may help to work over a low table, to be in a better ergonomic position to cut the cobs this way.

3: In a medium sized bowl, mix together the corn, chopped arugula, bacon, and onions. In a separate bowl, whisk together the oil, vinegar, salt and pepper, and cumin. Mix dressing into salad just before serving. Taste and add more vinegar if necessary to balance the sweetness of the corn.